inventree-zebra-plugin
SergeoLacruz
last modified: 07 Oct 2023
Zebra Label Printer Plugin for Inventree
This is a label printing plugin for InvenTree, which provides support for Zebra Label printers . It supports printing to just GK420T with one label size (50x30) so far. So it is very simple. It uses the zpl library to convert the png data provided by InvenTree to Zebras bitmap format.
It can output the print data either to a local printer connected to the computer via USB or to a network printer with an IP address. The output can be configured in the InvenTree plugin user interface. So the source code is a good example for this.
Error handling is very basic.
Installation
Install this plugin using pip with the following command::
pip install git+https://github.com/SergeoLacruz/inventree-zebra-plugin
Configuration Options
Printer Interface
Here you can chose between Local printer or network printer. Default value is a local printer.
IP address
In case you use an IP printer set the IPv4 address here.
Port
In case you use an IP printer set the port number here. The default port number is 9100.
Local Device
In case of a local printer set the device here. The plugin actually puts the data directly to the device libe /dev/usb/lp0. No printer spooler is involved so far.
How it works
First import all the stuff you need. Here we use the translation mechanism from django for multi language support. The import the InvenTree libs and everything you need for plugin. Here we have zpl for the Zebra bitmaps and socket for the IP connection to the printer.
The next part is this:
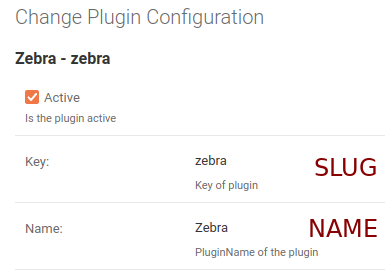
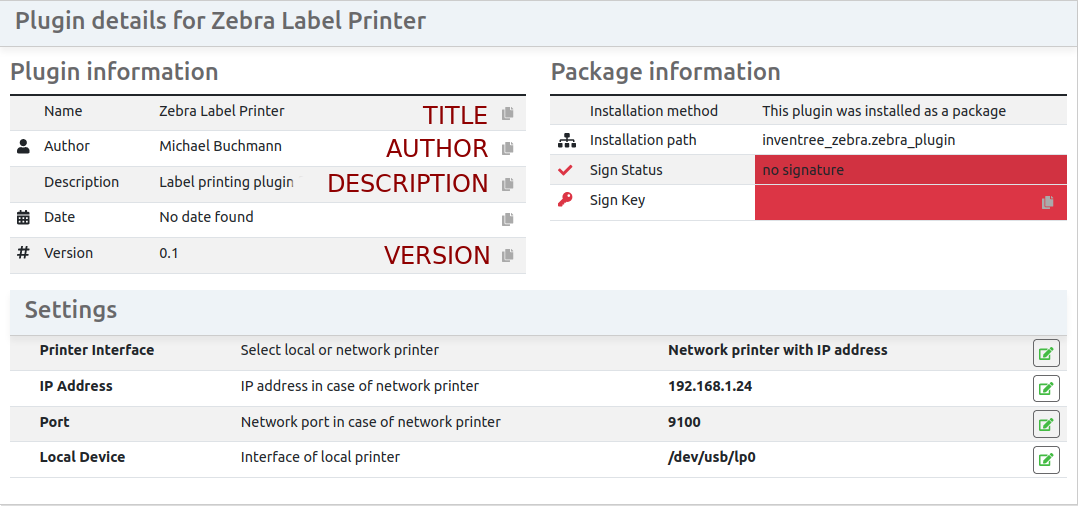
class ZebraLabelPlugin(LabelPrintingMixin, SettingsMixin, IntegrationPluginBase):

    AUTHOR = "Michael Buchmann"
    DESCRIPTION = "Label printing plugin for Zebra printers"
    VERSION = ZEBRA_PLUGIN_VERSION
    NAME = "Zebra"
    SLUG = "zebra"
    TITLE = "Zebra Label Printer"
The name of the class can be freely chosen. You reference to it in the entry_points section of the setup.py file. The parameters need to be like in the example. Then there is the description block. The keywords are fixed and need to be like that. The values are found in the UI as shown in the pictures below.
Then we add the configuration parameters.
SETTINGS = {
        'CONNECTION': {
            'name': _('Printer Interface'),
            'description': _('Select local or network printer'),
            'choices': [('local','Local printer e.g. USB'),('network','Network printer with IP address')],
            'default': 'local',
        },
        'PORT': {
            'name': _('Port'),
            'description': _('Network port in case of network printer'),
            'default': '9100',
        },
    }
We need to define a dict with the name SETTINGS. Please be aware the keys need to be in all CAPITAL letters like CONNECTION. Simple parameters are just text strings like the port. We can set a default. The name and description shows up in the UI. Instead of ta simple test we can also use choices. The first string like “local” it the key you use in the code. The second one is the description in the UI. After that we need to define a function:
def print_label(self, **kwargs){
The kwargs is a dict with the following keys:
- pdf_data
- user
- filename
- label_instance
- width
- height
- png_file
For the Zebra printer we use the png_file. This is a PIL (python Pillow) object with the graphic of the label in PNG format. The PIL object is a greyscale image. Because the printer can just print pure BW we convert this to a BW picture.
fn = lambda x : 255 if x > Threshold else 0
label_image = label_image.convert('L').point(fn, mode='1')
The threshold can by modified by a plugin parameter. 200 is a good starting value. This trick gives much better prints. We can put the result this directly into the zpl library.
l = zpl.Label(50,30,8)
l.origin(0, 0)
l.write_graphic(label_image, 50)
l.endorigin()
50,30 is the size of the label in millimeters. The third parameter is the resolution of the printer in dots per mm. As the Zebra printer has 200dpi we put an eight here. write_graphic converts the pillow data to zpl. 50 is the with of the image in mm.
The plugin was tested with a label of 50x30 mm defined using css and html in InvenTree as shown below. The DPI scaling can be chosen in the InvenTree settings. 400 is a good value because it is just double of the printers resolution. If you save the pillow data to a png file you get a size of 788x473 which fits well to that data.
<style>
    @page {
        width: 50mm;
        height: 30mm;
        padding: 0mm;
        margin: 0px 0px 0px 0px;
        background-color: white;
    }
The rest of the code is just output to the printer on different interfaces.
Detail section
License:
MIT
Issue Tracker
Sourcecode on GitHub
SergeoLacruz/inventree-zebra-plugin